Saturday, February 28, 2015

INFO: Strut Tower Brace

Information on:
Strut Tower Brace

Last revised on March 4th 2015.
If your YouTube channel is named 'Engineering Explained', then I have a problem with the graphics shown below on the right in figure 1.
Figure 1: From the following link https://www.youtube.com/watch?v=-S6H7ZdzBfE
Engineering Explained is a good YouTube channel and this post takes nothing from that. That channel is a great source and inspiration for a lot of enthusiasts though slightly incorrect in the free-body diagram (FBD) for their strut bar video. The comments on the left of Figure 1 explain why.

Furthermore, please see the following figures for an in-depth look at strut tower brace using a simplified McPherson strut assembly.

To simplify the explanation, the following figures make the following assumptions:
- suspension components (bars/springs/dampers) carry no weight/mass
- wheels carry no weight/mass
- car body is semi-rigid body and has mass (weight will be represented by a green arrow). Semi-rigid meaning the body can flex under certain loading and flex is represented by purple moments in rigid body structure.
- control arms are pinned and the top strut tower is fixed supported

At Rest/Driving Straight Forward (without Strut Tower Brace or Sway Bar):
When a vehicle is at rest or driving smoothly forward, the weight of the vehicle is the only acting force on the car. Figure 2 represents the weight of the vehicle in green about the centroid of the vehicle's rigid body.
Figure 2: Simplified cross-section of car at rest or moving forward without strut tower brace.
In this simple example, note the vehicle weight is supported by the control arm and strut tower. The strut towers will carry the majority of the weight. The horizontal dash lines on the control arms are likely force directions to balance the load equilibrium.

Figure 3 below takes a look at half of the car body at rest. The red arrows represent reactions at the links.
Figure 3: Simplified half cross-section of car at rest or moving forward without strut tower brace.

Under Corner Loading (without Strut Tower Brace or Sway Bar):
A strut tower brace (STB) adds rigidity to the car’s body/chassis/structure. Without a strut tower, some car chassis' are allowed to flex creating unused potential energy. The car chassis flexing contributes to body roll for the driver under cornering.

Too much body roll is undesirable because it feels unstable. Wheel traction worse case with too much body roll leads to the inside wheel not contributing to traction under heavy cornering. This means tire grip is dependent on outside wheel for lateral grip (left/right) and rolling grip (driving forward).


Figure 4 shows the same car without an STB taking a right turn. Notice the centrifugal force at the centroid shown in purple.
Figure 4: Simplified cross-section of car turning right without strut tower brace.
The centrifugal force is exerted at all 4 points of contact for the car rigid body. In addition since the car body is semi-rigid, the car body flexes under cornering. The car wants to roll left when it turns right. This flexing is represented by the purple moments at the car body base.

Instead of rolling left, the car body is countered by the forces on the left tire which push the car body back. So as the car is making a right turn, the car body wants to roll left but is pushed back. This creates a flexing of the car body that brings the right half closer to the left half. The clockwise purple moment in Figure 4 represents the moment that is reacted from the left suspension system and the anti-clockwise moment on the right represents the car body wanting to roll left.

Figure 5 below takes a look at half of the car body without a STB turning right. The red arrows represent reactions at the links.
Figure 5: Simplified half cross-section of car turning right without strut tower brace.

Under Corner Loading with Strut Tower Brace (without Sway Bar):
A strut tower brace adds rigidity to the car’s body/chassis/structure. The car chassis is stiffer at the top to decrease flex in the car body. The amount of unused potential energy from car body flex decreases with a strut tower brace and the difference in energy primarily translates forces from the outside wheel system to inside . Stiffer chassis means less body roll, hence a tighter and consistent car body for the driver under cornering.

Less body roll is desirable because it feels stable. Under cornering, force is reacted from the outside wheel & suspension system onto the inside wheel  & suspension system. Tire grip is shared between outside & inside wheels for lateral grip (left/right) and rolling grip (driving forward). Wheel traction worse case with no body roll means an infinitely rigid chassis . Potentially using too much tire grip to keep the car on the road instead of rolling forward. The inside wheel is approximately level to the outside wheel at all times including bumps and potholes. This is undesirable for daily driving.

Figure 6 shows the same car with an STB taking a right turn. Notice the centrifugal force at the centroid shown in purple.
Figure 6: Simplified cross-section of car turning right with strut tower brace.
This car still wants to roll left but the car body is more rigid now with an STB. Assume the STB makes the car from a semi-rigid body to solid rigid body, meaning no flex. The car body maintains the same shape through the turn. 

To help understand the force distribution (and ultimately tire grip distribution) with or without an STB, I will use working out as an example. You can think of adding an STB similar to using workout machines whereas without an STB you are using free weights. You get the most control with free weights and your hands are not dependent on the other. All the weight might rely on one hand. There are little to no additional loads to consider due to independence from the other hand.

You get stability with workout machines but more than likely you will be exerting more force in your workout due to restricted motion. You will get a predicted response path but will have to overcome additional forces due to dependency from one hand to the other. If you have enough strength (aka tire grip) to counter the additional forces, then it is not an issue. While you may have tire grip to spare, you are using more tire faster and reaching the grip limit sooner because of unwanted forces (forces not propelling you in the direction you want to go).

Figure 7 below takes a look at half of the car body with a STB turning right. The red arrows represent reactions at the links.
Figure 7: Simplified half cross-section of car turning right with strut tower brace.


CLOSING THOUGHTS

There is a lot of debate over how much a strut tower brace (STB) helps on a car. The forums range from consumers suggesting rear strut bars only, or STB helps with bumps and road transitions, or STB helps with chassis sag over the years, or STBs are simply placebo mods and have no effect on performance. The costs for STB are typically from $100-$300.

Ultimately it is up to the driver, STB type, and car compatibility. Front or rear STB effectiveness is dependent on chassis stiffness. If you are a serious driver and looking for performance gains regardless of costs, then there are other mods out there better than STBs. If you are an average consumer and the occasional sporty driver, the STB probably adds little to no benefit in terms of performance. For the refined sporty driver that knows their car and is in the middle of a detailed tuning iterations to gain that 1/10th of a second edge, then STBs are a good option. Regardless of the type of driver you are and how our opinions differ, I think at least we can agree that STBs look cool.

Friday, February 20, 2015

AUTOX: 2015 Autocross Solo Guide - Chapter 6: The Line

Guest Blogger Information on:
2015 Autocross Solo Guide
Chapter 6: The Line

Chapter 6 - The Line

This discussion will be geared toward autox specifically. I'll leave out detailing general racing concepts such as the traction circle, early & late apexing, etc. which you can find online anywhere. I'll probably miss a few things as I go along, but I'll try to include whatever comes to mind here.

One thing regarding the traction circle: an important conclusion is that there is a direct relationship between distance and speed. You can take a wider line faster, and you must take a tighter line slower. In other words, the more speed you try to carry through a corner, the greater the distance you will have to travel, if you are at the limit of grip. In many corners, you will have a choice between taking the line tighter & slower or faster & longer. In general, if you have to choose between the two, choose the shorter distance & slower line. With autox not being a high speed track with big straightaways, it's important that you make the course as short as possible for yourself. Trying to carry more speed but having to take a longer line usually does not pay off in autox. Obviously though, you'll want to travel as fast as possible on the correct line.


General

You first determine a general line when you walk the course, though as I've said before it can change when you actually drive it. Often times, regions will have novice walkthroughs that will guide you through the line. While these may be helpful, they take way too long. You can probably walk the course 2 to 2 1/2 times before they get done with one. Just grab a buddy and go. It's an important exercise for you to try to judge the line yourself anyway. The line you want to take will also depend on the car you're driving, though it will more or less be the same. On your course walk, you also need to pick out apex cones as best you can. This will come into play later when you are driving the course.

In general, most corners in an autox are very tight. A lot of times you'll want to be taking a late apex. Trail brake deep into the corner and apex it on the way out. The old adage "slow in, fast out" applies well here. Late apexing will help prioritize the exit. Remember though, the line shouldn't be determined corner by corner. You want to string the entire course together, prioritizing straights wherever possible.


Get closer to the cones

This comes with seat time and getting used to the car. You need to learn the dimensions of the car you're driving. You'll be able to see from videos how close or far you are. Don't be afraid in the beginning to hit cones - I encourage it. That is probably the fastest way to learn how much space you are leaving - and you might be surprised just how close you can get before you actually hit one. One thing you shouldn't do is this - turn-in, oops, think you're too close, pull back and turn again. Once you pick the line and you're on it, commit to it. If you hit the cone, you hit the cone - chances are you probably wouldn't have hit it anyway, so don't bother adjusting your line for it.

If you're leaving a lot of space between the cones compared to someone who is driving right on them, you are probably taking a worse line and leaving a lot of time out there. Consider this - if someone in the same car takes each corner, on the correct line, from braking on entry to powering out on exit, a tenth faster than you - and there are 15-20 corners in an autox, you're giving up about 1.5-2s to that person.

Obviously this doesn't mean you want to get close to every single cone. Keep your eyes open for the apex cones you picked out on your course walk. These are the main cones you want to get close to on your run - imagine they are like shining beacons. You want tobackside these cones - as in, your inside rear wheel should almost be touching them. Backsiding cones will really aid in keeping your line nice and tight, as well as get you to turn in a little sooner.

Slaloms

Pace out every slalom during your walk. In general it's a good practice to have some kind of an idea how far all the elements are from each other. Once you get a good amount of experience, you should know roughly how fast you can go through the slalom based on how much you paced it at and the conditions. For example, I know for about a 30 pace slalom on dry concrete I can keep my foot flat on the gas in the Mini. 25 paces or so, I need to be a hair slower and just maintain throttle through it. 20 paces or less means it's a pretty tight slalom. I'll probably try to dive in, brake hard, and try to power through & out of it. Even though you can tell just by looking if a slalom is fast or slow, being armed with the knowledge of exactly how long it is will help you go through it faster.

Look through the slalom, not at the slalom, not at the cones. Try to center your perspective before entering the slalom. Turn early into the first slalom cone - backsiding cones is very important here. If you get late on the slalom, it's very difficult to recover from it. As soon as you cross the center line, you want to be turning the other way. My instructors told me you want to "slither" through the slalom. You want it to be a smooth, snaky, back and forth rhythm. Going out too far to the left or right in a slalom will eat a huge chunk of time, not to mention be much harder on the tires and potentially upset the balance of the car.

If the slalom gives you a choice of which side to enter on, 4 out of 5 times you'll choose based on what the exit is like. You want to do what is optimal for when you get out of the slalom. Memorize it during the walk so you don't need to think about it. For example, "1st slalom left, 2nd slalom right." Finally, if there is anything remotely close to a straight coming out of the slalom, get WOT as soon as you pass the penultimate slalom cone, not after you pass the last one.

Sweepers, Transitions, and U-Turns

Most courses I've been on will have at least one fairly big sweeper. Small or big, the important thing here is to connect the cone at the beginning and the cone at the end that you want to start exiting by. Essentially this is 2 corners combined into one, and you are double apexing it. Stick by the cones you picked out, keep tight through the sweeper as you go through it, and aim for the exit cone that you picked out.
Transitions are when there are a series of turns, multiple offset gates, chicanes, "S"s, etc. Like I said before, don't get caught up in making a nice, curvy line through it - keep your line as straight as possible through these, with a focus on the exit. Don't be fooled by offset gates and Chicago boxes - these are all just variations of slaloms. Focus on the inside cone of the gate, not the gate itself. Chicago boxes are just tight 3 cone slaloms with a box around it. 

Most courses will have a u-turn somewhere along the way. Either a tight u-turn or even a single cone to go around. Set this up as best you can before you enter, and just be ready to give up speed here. Give up on the entry, slow the car down significantly, and focus on the exit. This applies to tight corners in general.

--
Ultimately, you want to not worry about how the cones are set up or what the element is etc., and just stick to the driving line as best you can. There are going to be a million different lines you can take and everyone drives differently. Different lines are suited better for different cars and setups as well. Just remember - get the line right first, then add speed.

Next chapter - Mental Game

Wednesday, February 18, 2015

AUTOX: 2015 Autocross Solo Guide - Chapter 5c: Driving Techniques, Inputs - Braking

Guest Blogger Information on:
2015 Autocross Solo Guide
Chapter 5c: Driving Techniques, Inputs - Braking

Chapter 5c - Driving Techniques: Inputs - Braking

Braking

You can think of acceleration as managing load to the rear, and braking as managing load to the front. Braking is probably the most difficult input to master. As much variation as throttle can have depending on car, power, tires, and surface, brakes can have all that and more. In general, you want to squeeze the brakes, not slam them. Braking during racing is the opposite of braking during street driving in the sense that when you approach a stop on the street, you coast/light brake, and then squeeze a little harder to make the final stop . When racing, you want to brake hard first (threshold brake) and then ease off as you turn into the corner. 

Before getting into actual braking, I should mention throttle lift. Technically this is related to throttle input (or lack thereof), but I included it here because the purpose of the throttle lift is to shift weight onto the front of the car. Your smoothness or severity will determine how the car behaves when lifting. Sometimes cars just need a little bit more traction in the front to dig into the line a little, and lifting the throttle will put more weight and thus traction on the front end of the car. Completely and suddenly lift mid-corner, and you might find yourself going sideways. Just a slight lift may be all you need to tuck in the nose of the car. This is more actively practiced with FWD/AWD cars that tend to understeer, though it is used by everyone.

As far as actual braking technique goes, keep in mind that neither of the Miatas has ABS. That means we will really need to work on threshold braking. Threshold braking is just a fancy term for braking at the limit of the tires. In cars with ABS, you can squeeze the brakes as hard as you want. You don't have to worry about locking up, as the ABS will pump the brakes for you when you reach that point. With the Miatas, brake with just enough force that you don't lock up the wheels. In other words, you want to brake with maximum force while maintaining static friction between the tires and the road. As with the throttle, this depends on all the different factors of the car, tires, and conditions. Keep in mind that if you are threshold braking, you are using all the grip the tires have - don't plan on steering. Threshold braking is what you will do in the straight line you are taking before you enter the corner.

When you've slowed down enough and reach the point you want to turn, you want to ease off the brakes as you turn the wheel. Picture again the string tied to the steering wheel & brake imagery. As you let go of the brake, the string has more slack for you to turn the wheel. This needs to be a smooth process - you can't just let go of the brake and then yank the wheel. Once you're off the brake, you want to be ready to get back on the gas and unwind the wheel to complete the turn. Again, the key here in all of this is smoothly stringing together all of these actions. Failing to do so can upset the balance on either end of the car. Don't overthink the process either though - doing that will result in you taking corners very slowly. Let your body and your instincts take care of it as you gradually build more confidence and skill.

It's difficult to get into things like when to start braking, for how long, etc. because again all of this depends on the situation. For starters though, most novices don't brake hard enough.They brake too early, too gently, and for too long. You want to get hard on the brakes, and often times for autox trail brake deep into the corner. Trail braking is essentially easing off the brakes for the turn like mentioned before, but it more specifically refers to going deep in and keeping just a touch of brakes on through the apex to keep that weight on the front of the car. A lot of novices completely let go of the brakes once they want to turn and this usually results in understeer, as the weight leaves the front just when you need it the most. Trail braking can prevent that. It will also let you practice late apexing, which is what most autox corners are.

I'll just briefly mention left foot braking (LFB) here. Left foot braking is used by a relatively small number of autoxers and especially FWD/AWD drivers. It is naturally suited for most autoxes because we only stay in one gear, and thus the left foot has some freedom in what it can do. It is also used a lot by rally drivers. LFB basically lets you get in a touch of brakes whenever you want without having to let go of the throttle. There's no time lost in switching from throttle to brakes or vice versa, and helps a lot with cars that understeer, as u can essentially shift weight to the front whenever you need a little more bite. It is also very well suited to turbocharged cars, as it allows you to keep the boost up - there will be no loss of spool when you exit the corner if you never let go of the throttle. For us, for our current level, this is unnecessary, especially in the Miatas. your left foot is not familiar with braking pressure, and you will be locking up the brakes all the time. For now, there are other areas to be focusing on.

--
Overall you want to use all of these inputs and driving technique to manage the balance of the car. Through your inputs, you have complete control of the car's behavior and a well set up car should be able to exhibit a wide range of handling characteristics. Your goal in getting seat time is to master all of these inputs to reach a level of comfort in the car where, when you see what lies ahead, you will know what line to take, when to brake, how much to turn, and when to get on the gas.
Next Chapter - The Line

Monday, February 16, 2015

AUTOX: 2015 Autocross Solo Guide - Chapter 5b: Driving Techniques, Inputs - Throttle

Guest Blogger Information on:
2015 Autocross Solo Guide
Chapter 5b: Driving Techniques, Inputs - Throttle


Chapter 5b - Driving Techniques: Inputs - Throttle

Throttle

Throttle is a fairly straightforward topic, but long enough that I decided to cover it separately here. First, turn off any and all traction control systems. I don't think the Miatas have any, but we'll need to make sure, as the NB might. We also need to learn whether it stays on/off when you turn the car off. Unless we're talking really high HP cars & very, very advanced traction control systems geared toward racing, it will always be slower and intrusive. Regardless, learning how to deal with power and tires slipping will be good driver training. Peak acceleration is with a little slip anyway. Don't worry about shifting either. All you need to do is go from 1st to 2nd and stay there, so go ahead and clear that out of your mind as one less distraction to worry about. Once you get to 2nd gear you're done. Both hands on the wheel and no need to think about it again until you cross the finish line.
The most important thing about throttle application is that you need to roll onto the throttle, not stab at it. Again, you want to be quick but smooth. The throttle is not an on/off switch. This is a little bit more difficult to apply since our cars are underpowered and we can get away with a little more as far as getting on the gas. However, even if we don't have enough power to break traction under normal circumstances, mashing the gas won't net any significant time.Abrupt throttle application can upset the balance of the car/suspension and result in a loss of grip and acceleration. With a high powered FWD car, for example, the initial burst from an abrupt throttle will shift weight towards the back, away from the powered tires, making it more likely to break traction in the front and therefore result in slower acceleration. Obviously with RWD you want the weight to shift back onto the powered wheels - as you load the rear you give yourself more traction in the rear, which then gives you the ability to accelerate faster - however, this has to be a smooth process in order to maintain traction. It is a difficult balance between being smooth with the throttle and yet not lazily slow in trying to do so. It doesn't mean you can't go wide open throttle (WOT) quickly - you can and should, as long as you have the traction to do so.

Traction, and therefore throttle application, will depend on the surface you're driving on - wet or dry, asphalt or concrete, bumpy or smooth, hot or cold, and whether the tires themselves are hot or cold. Especially in the colder months of the season, tire temperatures and the time of day (which heat you run) can have a significant impact on the car's overall level of grip. You just have to experiment & learn via seat time what the car/tires can do. Regardless of condition, being smooth with the throttle will let you accelerate as fast as the car physically can.
I won't get too technical into limited slip differentials (LSDs) but we are fortunate to have some mechanical variant in both Miatas. Viscous LSDs tend to wear out and become open LSDs toward the end of their lives, so I don't think we should be too surprised if the NA spins a tire trying exit a corner, especially since the tires aren't as fresh as the NB's. The NB has a Torsen LSD and should be good as long as we maintain the fluids. It's important as a driver to know what the car has in order to explore what it can do. In this case, you should be aware that with an LSD, you can get on the gas a little bit earlier than without, which will also train you to be smoother. It will allow you to exit faster, and overall carry more speed throughout the course. Remember, you want to get back on the throttle as soon as possible. As soon as you're past the apex (sometimes before), you want to start applying the throttle, quickly and smoothly.

Finally, you never want to be coasting at an autox. This is somewhat of a generalization, and the mindset here is more important than the physical input. In general, you should either be braking, accelerating - however quickly or slowly, or have some kind of maintenance throttle. 

Next Chapter - Driving Techniques: Braking

Sunday, February 15, 2015

D.I.Y. MAINTENANCE: Owner Fixes Camry Hybrid Battery Problem and Saves $4400

Do-It-Yourself car maintenance example on,
Owner Fixes Camry Hybrid Battery Problem
And Saves $4400

Great example for hybrid battery problems.  Instead of a faulty battery cell or unit, turns out the copper buss bars were corroded too much for proper conduction. It helps that the author worked as an electrician before. With proper research and safety measures, this same repair can be done by the average joe.

Source: http://imgur.com/gallery/j8Bcp/

For fun, he also made a Jurassic Park Explorer: http://imgur.com/a/DMJKl#0

Thursday, February 12, 2015

AUTOX: 2015 Autocross Solo Guide - Chapter 5a: Driving Techniques, Inputs - Steering

Guest Blogger Information on:
2015 Autocross Solo Guide
Chapter 5a: Driving Techniques, Inputs - Steering

Chapter 5a - Driving Techniques, Inputs - Steering

The previous chapter and the next couple will really be the meat & potatoes as far as getting faster in autox, with this chapter being one of the most important topics. This chapter will go over driver inputs for steering and throttle & braking. I should note that while I break these up into their own categories, they are all very closely related when we are talking about maximum useable grip of tires, and in general this is also related to the racing line. 

I assume by now we all know the classic illustration of the taut string that is tied from the gas pedal to the steering wheel. Basically it means you can't turn and use 100% of the grip and then also throttle and try to exceed 100% of the grip, it's give & take between all the inputs. That much is obvious but I'll cover these topics assuming no one knows anything.

Steering

Steering was a struggle for me early on in 2014. I was very abrupt with my steering wheel. I think this was a combination of poor skill, not looking ahead enough, and not following the line. Abrupt steering puts a lot of load on the tires and a lot of the times will attempt to use more grip than the car has. You want to be as smooth as possible with the steering wheel - quick, but smooth. There is a paradoxical saying that goes "slow is smooth, smooth is fast." Don't yank at the steering wheel. It doesn't mean you can't be fast with it, but think of it more as being quick and nimble with it. I think this late turn, cranking the wheel is somewhat a product of street driving. We're confined to our lane, get all the way nearly into the turn, then crank the wheel to make the turn, the opposite of what you want to do in racing.

If you are an abrupt steerer like me, it is going to take some seat time to get rid of that. If you're not sure whether you are or not, video reviews will really help. I don't know that I would have ever really known without watching the videos. Here's one from my very first event in '14 and one from my last event in the Mini:


Note how, especially after 28s, going through the chicane there I'm really yanking at the wheel, turning late and then whipping the steering wheel to make the turn. I lose grip from trying to turn to fast, and then I understeer and try to turn the wheel even more to complete the turn. 


In this video, I'm much smoother with the wheel overall. Things are less frantic because I'm planning ahead more. Still not perfect, I cock the wheel once pretty good at the turn-around at 20s. I make a tight one around 45s too, but that was more because I had to, it was a super tight slalom coming out of a fast sweeper.

Anyway, the point is to be smooth with the steering. Begin the turn earlier than you think you need to and that will help with a lot of it. Also keep in mind that you need less steering inputthan you think you do. There is a saying that goes something along the lines of, whoever has the steering wheel straight for the longest wins the race (all else held equal). What will help you here is to visualize the line you want to take, and only steer enough to follow that line. 
I think one of my problems when I started was that as soon as I entered the turn, I wanted to "complete" it right away - I didn't follow a line or make any arcs, I made 90 degree or more acute turns. As soon as I got in the turn, I wanted out. Instead of that, try to ride the racing line with your steering. Finally, be sure to unwind the wheel as you exit. Don't continue turning any more than you have to. I still have a problem with this. Sometimes you get caught up in making swoopy S lines through corners when really you just need to blast through it with minimal steering input.

Next Chapter - Driving Techniques: Throttle & Braking

D.I.Y.: Wheel Spacers on a G35 sedan

Guest Blogger on:
Wheel Spacers on a G35 Sedan

Thank you for having me as a guest blogger! I recently installed wheel spacers on my 2006 G35 sedan, and I'll take you through my thought process and some of my considerations.

Figure 1: Overall Pictures of Before and After.

The Problem: 

Wheels looked odd with a "tucked" look after lowering the suspension by about 1.25" from stock height. Normally I don't care too much about pure aesthetics, but it was enough to annoy me into looking for a solution.

The Options:

1) The best option is always to get a set of wheels with the proper width and offset to suit your application and tastes. 
Normally I would go for this option, but I actually really like the look of the stock 18's, I prefer using OEM wheels, and I just purchased new tires, so I wasn't about to spend $1000+ just to get a nicer stance. My current setup is 18x7.5 +45 offset with 235/45/18 tires. If I was starting from scratch (i.e. car sitting on blocks), I'd get a set of lightweight 18x9 +30 offset, running 255/40/18.

2) The next best option is to widen the track with the use of wheel spacers. This is what I used. I will say that there is a lot of negative hype about wheel spacers, and for good reason. After doing a lot of technical reading, I've come to the conclusion that concerns are generally well founded. A lot of the horror stories result from people not using common sense. However, spacers can be used safely (and they are, even on AutoX courses and on the track) if you know a few key things:

   a) They must be "hubcentric" spacers. This properly locates the axis of rotation between the wheel, spacer, and wheel hub by means of features on the spacer which aligns all three components. The diameter of the spacer hub should match the wheel hub and wheel exactly (female on one side, male on the other). This is a much more reliable way of getting everything lined up properly compared to relying on the lugs to get everything centered. The consequence of misalignment is tooth-jarring vibration at high speeds.

   b) Proper studs should be used. For those with smaller spacers (5-10mm), this likely means removing your factory studs and replacing them with longer ones. For larger spacers (15mm+), this means using spacers with studs already attached. 

Drawbacks to Spacers:

1) Increased scrub radius. This is the same problem that would result from using the same width wheel/tire but lowering the offset. The axis of rotation from steering movements is no longer in the center of the contact patch. The major symptom is the increased effect of 'tramlining,' which is the phenomenon of your tires wanting to grab and follow features on an uneven road surface. More on this later.

2) Increased wear on wheel bearings due to lengthened lever arm. Again, this is a problem that is shared with reducing the offset of your wheels. I view bearings as wear items, and if I have to replace them 10% sooner - so be it!

3) Increased rotational inertia and unsprung mass. This one is unique to spacers, as using wheels with a different offset does not inherently add any mass. The extent of the effects is usually not noticeable, as the spacers are made of lightweight 6061-T6 aluminum alloy and the weight is added close to the axis of rotation. I personally did not notice any dynamic differences from the result of adding this weight.

The spacers I used:

I picked up 25mm hub centric spacers with integrated studs, made by a company called Precision European Motorwerks. The studs secured in the spacer are Metric 10.9 studs (equivalent of Grade 8 bolts), and the spacer simply bolted to my wheel hub with the supplied M12 nuts:

Figure 2: Spacer Install.


I initially found them on Amazon for ~$62 a pair and they had good reviews. I then checked eBay to see if they listed there as well, and sure enough they were - and for only $55 a pair! I purchased two pairs, and they arrived at my house in just two days. There are many "brand name" options out there, but lets face it - they are all just machined aluminum. As long as you trust the quality of the machining, all of the hubcentric spacers are going to be about the same.

Installation:

They installed without issue. Before bolting on, I checked for play between the spacer and the hub and also between the spacer and the wheel. It was dead nuts on. The diameter spec was almost certainly within 0.001". The quality of the machining was excellent. No problems trusting the supplied metric 10.9 grade studs.

I applied copper anti-seize lube to the back face of the spacers and to the OEM studs since I probably won't be touching them again until I need to replace my rotors again. Tightened to 85 ft-lbs. I used a 2x4 and the power sliding seat to keep pressure on the brake pedal while I tightened down the fronts.

The rears came out a little further than I was expecting, so I had to roll the fenders a bit. Used a heat gun and a 2" SCH40 PVC pipe, about 2.5' long. Each side took about 20 minutes to roll and was relatively painless.

Impressions:

For the most part, the spacers are not noticeable at all from the driver's seat. I was certain that widening the track by 2" would have a tangible effect, but I have not noticed it at all in the month I've had them on so far. I also did not notice the effective decrease in spring rate by the lengthening the lever arm. I have noticed some of the tramlining effect, although I'm unsure if that is just due to my heightened sensitivity to this.

The biggest difference is just in the stance - the way the car looks. My goal was to improve the look of the stance, and these spacers achieved that goal without hurting my wallet. Mission accomplished!

Figure 3: Front Wheels before & after.

Figure 3: Front Wheels before & after.

I often find myself doing double-takes on my car now as I'm walking away after parking. An unknowing observer would probably be wondering where the hot girl is hiding that I keep turning around to check out.

Best,
Guest Blogger.

Friday, February 6, 2015

AUTOX: 2015 Autocross Solo Guide - Chapter 4: Driving Techniques, Looking Ahead

Guest Blogger Information on:
2015 Autocross Solo Guide
Chapter 4: Driving Techniques, Looking Ahead


Chapter 4 - Driving Techniques, Looking Ahead

Looking ahead is one of the most common things people will tell you to do when you first start autoxing. It sounds really basic, and it is - but that still doesn't stop novices, and sometimes intermediate drivers, from failing to exercise this habit. What people typically say is that you want to be looking 2-3 gates ahead (gates being an element/turn/offset). I don't know about an exact number like that, but what you definitely want to do is be aware of what's coming up ahead. Regardless, IMO sometimes looking ahead means just having it in your peripheral vision or awareness, and sometimes it means actually focusing on gates further down the course, actively looking at them.

General Awareness

When you only get 5-6 cracks at a course (3 at nationals), you don't want to waste a run because you got lost or confused somewhere out there. Looking ahead helps prevent this (duh). In this sense, you need to be aware of what is coming up & have it in your peripheral.  When I walk the course, one of the things I'm trying to do is memorize a "general" course layout. i.e., "Left, Right, Sharp Left, Slalom, U Turn." I don't need to know exactly what it looks like yet - I'll find out when (before) I get there. I just need to know the basic element to know what to look for.
Then when I actually drive the course, my eyes look for that general element so I know where to go. This technique will help you know the course better without having to completely memorize it from the get-go, though you will eventually memorize it. Think about it like this - memorizing the course is looking ahead before you even get to the starting line.
Rally drivers have a million blind corners they have to fly through completely balls out - but what do they have? They have a codriver reading to them exactly what is coming up ahead - in other words, they have someone looking ahead for them, which lets them run through the course at full speed & confidence. In autocross, having a codriver doing that for you in the beginning will help you be faster at that particular event, but eventually you need to train yourself to do it on your own. One of the things I will be doing when I ride along is exactly that - probably shouting "GO GO GO" if I see it's relatively straight up ahead. Anyway, I think that's a pretty good illustration on how looking ahead adds speed.

Conscious & Unconscious Components

The other thing I do when I walk the course is I try to construct the line as I walk it. Keep in mind however, it may drive completely differently than it walked - often that is the case.
Regardless, looking 2-3 gates ahead helps me know what line I want to take when I enter a corner. The line you want to take going in is largely impacted by how you want to exit, so you need to "see" that full line going past beyond where you currently are. That bit alone adds so much speed - you know it's relatively smooth ahead, so long, long before you ever get there you keep your foot on the gas all the way through, or you know a sharp turn is coming two elements after the one you're currently at, so you know what angle/line to take through the next element, to execute better for that 2nd element. In this sense, looking ahead while on course translates to actively planning ahead to know exactly where to go & how to get there. This is the conscious component of looking ahead.
The unconscious component of looking ahead is that, like many other activities, you will go where your eyes go - the same applies to driving a car. When you go bike riding, you look ahead - not at your front wheel. When you bowl, you look at the pins or the arrows ahead - not where the ball first touches the ground. With racing, you will steer where your eyes lead you - so look where you want to go, and your car will take you there. This sounds basic, but in the beginning a LOT of times you just look at the cone of the corner you're approaching and not any further than that. It's not just looking at the corner you're at that's a problem - a lot of people, and I'm guilty of this too, often look back in their rearview mirror, usually to see if they've hit a cone. For this reason, some people turn their rearview mirrors up & out of the way, for a little better view up front and so they don't try to look at what's behind. I leave that up to you - I'm not 100% comfortable moving forward until I know I did or didn't hit that cone, so I normally leave mine set where it is.
One last thing to keep in mind in terms of looking ahead - there are no cones on an autox course. They should never be in your focus, always in your peripheral. Let that help you focus the path you want to take through the course - the cones are on the outside of it.

Next Chapter - Driving Techniques: Inputs

AUTOX: 2015 Autocross Solo Guide - Chapter 3: Seat Time

Guest Blogger Information on:
2015 Autocross Solo Guide
Chapter 3: Seat Time

Chapter 3 Driving Techniques - Seat Time

Seat Time

As far as driving goes - there's very little I or others can tell you that will make you faster. The only way to really improve is by getting seat time in. That said, there are obviously things to keep in mind that we'll go over later.

I'm counting around 20 events this year in the St. Louis region alone. It's also a good chance to drive/experiment without being as worried about how you do. Sometimes when you race competitively you get too caught up in getting in a clean run (no cones) that you end up driving too conservatively. Finally you'll also want to visit http://ccsportscarclub.org/ & hit Online Registration and register on axware at least for that very first event ($5 discount for online preregistration).

So, there's really no way around seat time, but there are ways to speed it up. Obviously we have our Test 'n Tunes on 3/29 & 8/2 in STL. 20 runs each driver for $45-50. There are also novice schools that you can attend both in Champaign & in St. Louis. Champaign has it's annual driver's school on 4/11/15 for $75, which to me is extremely worth it - I'll probably bring my Evo to that one if the car is ready. You get 1 on 1 instruction & about 20 runs. St. Louis has 3 schools - Evo School (coincidental naming), Novice School, and Starting Line. The Novice School is about $100 for 20 runs, it's the only one worth the money.. The other schools are both a few hundred each.You can attend all or none of these. You may or may not get anything out of the instruction, but seat time always always helps, especially in a non-competitive environment once in a while.

I'd say 60-100 runs (10-15 events) is a great amount of racing for one season. Just as an FYI, my hypothesis is that it takes at least 1,000 runs to get to "nationals" level, about 10 years worth of autoxing. I'm cramming down 200+ runs/yr in hopes of getting nats-level good as quickly as possible, so I'm still in the early phases of my experiment. The first year you improve/correct the big stuff, and every year after that is just more and more marginal things, tenths at a time.

Anyway, the real key of seat time is that you get used to pushing the car. For me, I know my technique still isn't great and my lines are still meh, but the one big thing I gained in 2014 is that I'm now used to being on the edge. You learn to trust the car. You might hear me shout that if I ride along with you in the beginning. Trust the car, it can go faster. You start to understand how fast the car can go under what circumstances. At times, you'll spin out, have tank slappers - you'll be on the ragged edge, but you'll start to get it. Even on the last event of the year last year I spun out on my first run. After that, I had a friend ride along with me throughout that event and he told me there were multiple times he thought I was gonna lose it - but I never did, and I never ever felt like it was out of control. That's the goal as far as what kind of comfort level you want to reach driving the car.

When you're not comfortable, it makes a huge difference. I dropped about 20 places in index the one time I drove Doctor STS Miata. First time driving a Miata, or rwd, in anger. I just wasn't comfortable pushing the car. Didn't know how fast the car could go. In the slaloms I'd be worried about spinning out and losing it, etc. I'm 100% certain I would have actually gone faster in my Mini than I had in his car. Just goes to show how important getting used to one specific car is.

I was going to include Looking Ahead this chapter but it's fairly important & long, so I decided to make it it's own. Also, I probably should have included this in the last chapter - I'd strongly recommend getting your own helmet - borrowing helmets is nasty and we're going to be driving a lot this year. These are quite cheap & legal: http://www.amazon.com/gp/product/B005JHSH3Q/ref=ox_sc_sfl_title_8?ie=UTF8&psc=1&smid=ATVPDKIKX0DER

Next chapter: Looking Ahead

AUTOX: 2015 Autocross Solo Guide - Chapter 2: Car Prep, General, & Event

Guest Blogger Information on:
2015 Autocross Solo Guide
Chapter 2: Car Prep, General & Event

Chapter 2 - Car Prep, General, & Event

Car Prep

Luckily enough, we are good in the area of car prep. Both the NA & the NB will be fine for now and we can decide later for the NA whether or not we want bumpstops. If I had to guesstimate, I'd say the NA will probably give up 1.5-2s to the NB, given the tire & bumpstop situation. IF both cars were on same tires, bumpstops etc., I'd say it's a 1s difference, a little less if the course is more technical, a little more if more power is involved. If it's giving up less than 1.5s with same driver, I'd be inclined to leave it alone (not add bumpstops) because balance even without must be pretty decent.

The region does something called 'annual tech' early in March - you bring the car to a location, probably Gateway, and they tech it a little more strictly than usual, you sign a waiver etc., and then no more tech inspections for the year. Just one less thing to worry about. I'll leave pulling the mats out up to you guys (I don't anymore), but I'd leave the spare & tools at home. 

The only other thing I can think of is an alignment. It may not be a bad idea just because the cars are so old, probably haven't been aligned for a really long time, etc. It will make a big difference in how the car feels. Again, I leave that up to you. I can get my guy to do it to the specs we request ("race" alignments) for $60/car, or we can try it on our own. We just need to max camber & 0 the toe. Whichever way we do it, I think it's pretty crucial that we do.

EVENT DAY

Arrive early

Ask co-owner 1 about this one. I'll have an exact time of when to arrive soon, and for co-owner 1 it'll depend on his work assignment, but right now I'm gravitating to around 8am. This should give you enough time to get settled and walk the course. For any Champaign events you guys want to attend with me, we should def split a hotel the night before - I normally go the morning of, and it can be brutal. 

Know the Course

This will be one of the most important things to do, period. Minimum number of walks should be two, especially for novices. The more you walk, the more familiar you will be when you're driving the course. Less 'sea of cones'/'I'm lost' effect. You'll be focused less on where you are and where to go and more on how & how fast to go. If you can manage it, walk 3 times. I think at nationals events I walk the course about ten times, after hours upon hours of studying the image of the line lol. Later in the season you might feel more comfortable with 2. I still usually walk the course 3 times. First is usually a chatty, general walk. Second is less chat and more about what line to take. Third is a brisk focused walk. Something like that - it's different for everyone. 

EVENT

General

You guys are lucky in the sense that you will be able to push each other. Just knowing the fact that the other guy went half a second quicker lets you know the car has it in it, and that you can push harder. Here's how I'd like to split up the runs for general events, at least to begin with: First 3 runs together and/or with me riding along, last 2 runs on your own. First 3 to give you an accelerated familiarity with the course, last two for speed & competition. For a car like the Miata, light, low torque, no ABS, 150-170 lbs is a big deal, should help with your raw times. Also, one of you will be faster than the other - it'll make you guys start pushing the car harder, get more familiar with the car's limits, etc. Test n Tunes, etc. are a different story. 

Also, get to know a few people, especially if there are any in your class in the same heat. Ride along when possible, watch their technique. Try to get a feel for who the competitive ones are that don't want to give ride alongs, and who don't care all that much. 

Video & Data

We will be taking a lot of video & data recordings this year. Normally I record every run. We can use my point & shoot or something else if you guys want. Post-event video review is always a great way to see how you drove from a 3rd person perspective, what you're doing behind the wheel, what line you're taking compared to the other. Doubly useful since you guys will be in the same car. We'll try pinpoint who picked up time where, etc. I also have a data acquisition system we can use, though I personally haven't found much utility from it.

Next Chapter: Driving Techniques - Seat Time & Looking Ahead

AUTOX: 2015 Autocross Solo Guide - Chapter 1: Goals

Guest Blogger Information on:
2015 Autocross Solo Guide
Chapter 1: Goals

Chapter 1 - Introduction
All right folks!

Solo season fast approaches with a ton of races upcoming for the cars. This e-mail thread can be used as food for thought for autoxing/competing, driving techniques, etc. Obviously the Mini is a fwd car, but same basic principles apply... I say that but the one time I drove rwd last season I was terrible in it - more on that in the future.

First things first - SCCA memberships - get one if you aren't one already. You can wait until March but the sooner the better - you need it if you want to preregister on motorsportreg.com. Use ### as your reference when you do register for SCCA. If that's already taken care of, remember Geico gives discounts if you're an SCCA member..

Goals - we should talk about goals first. I think we all have roughly the same idea in mind as far as what we want out of autoxing for now - maybe not be the best, but get pretty darn good regionally. St Louis, as well as most regions, rank drivers by index -  a made up number to somehow take the car out of the equation based on a lot of fuzzy math etc etc. The key takeaway from this is that it is a very very good year for most stock classes (save for GS & HS) which got a huge drop in index. ES, for example, went from 0.814 to 0.808. This means that last year, if you had run 45s flat, your index time would be 36.63 - this year, running 45s puts you at 36.36 - boom, you just went 3 tenths quicker without improving at all. The flip side of this is that other stock classes have similar gains. 

Anyway, the goal here really is to get within 3-4s of the #1 index driver - his name will be Doctor. Novices last year breached into the top 20, but after the index adjustments this year I don't see it happening too much. 3-4s behind index will usually put you anywhere from 25-30 to 35-40 overall, depending who's there. Your goal will be to get under Top 30, and your goal is to be novice champion, 1st and 2nd. I think these are fairly reasonable goals, but keep in mind everyone is shooting for the same thing - so it won't be easy. You might not hit any of these goals until the last few events.

Goals: Top 30, within 3s index of #1 driver, novice champion.

Next chapter: Car prep, General & Event

Sunday, February 1, 2015

PRODUCT: Ramps for Low Profile Cars

Product Information on:
Ramps for Low Profile Cars

Two ramps for low profile cars (lowered car):

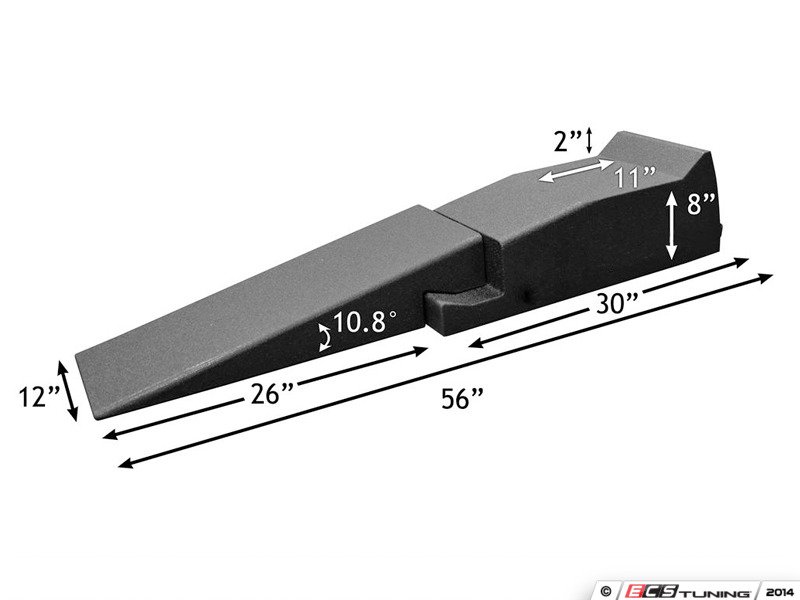
Race Ramps 56" (with removable sections)
Length: 56", Lift: 8"
Price: $228 (w/o shipping)
Listing on Amazon: Race Ramps RR-56-2 56" Race Ramp - 2 Piece

Length: 67", Lift: 10"
Price: $333 (w/o shipping)
Listing on Amazon: Race Ramps RR-XT-2 67-Inch XT 2-Piece

Description on Amazon.com:
  • Lightweight - easy to carry and maneuver
  • Special construction - won't scratch or mark your floors!
  • Remove the bottom portion of the ramp for easy side access
  • 100% solid core design
  • Unscootable! Won't slip or slide, no matter the surface
  • 2-Piece, removable ramp wall for vehicle side skirt access
Figure 1:Race Ramp 56" Shown. Picture from Amazon.com.

Schwaben Ramps
Length: 56", Lift: 8"
Price: $240 (w/o shipping)
Listing on ECS Tuning: 2-Pc 56" Low Profile Car Ramp - Pair

Length: 67", Lift: 12"
Price: $352 (w/o shipping)
Listing on ECS Tuning: 2-Pc 67" Low Profile Car Ramp - Pair

Figure 2: Schwaben Wheel Ramp 56" Shown. Picture from ECS Tuning.